Global Entry Pass: Applying, Interviewing, & Using Your Membership
Are you sick of those pesky lines at airport security? At one point, we were too. But now with Global Entry, we have the advantage of speedily making our way through airport security on all domestic flights and customs on international air travel.
What Is A Global Entry Pass?
A Global Entry pass allows trusted travelers to have expedited entry upon arrival in the United States. For the frequent flyer, having a Global Entry pass will save tons of time while making your way through customs and security in many airports around the world!
Here are some added bonuses to having a Global Entry pass:
- No processing lines
- No paperwork
- Access to expedited entry benefits in other countries
- Available at major U.S. airports
- Reduced wait times
- TSA Pre✓® Eligibility
How Much Does Global Entry Cost?
The application fee for Global Entry is $100 and it is non-refundable. But, on the flip side, it does last 5 years. Not sure you want to spend another hundred right now? Check your credit card perks. There are MANY credit cards that will waive your Global Entry fee at no extra cost.
A Few Current Credit Cards That Waive The Global Entry Fee:
- Chase Sapphire Reserve
- Platinum Card from American Express (also waives fee for each authorized user)
- Capital One Venture X
- Capital One Venture
- United Explorer Card
- Delta SkyMiles Platinum American Express
READ MORE: The Best Credit Cards for Travel
Global Entry vs. TSA Pre√
As previously stated, a Global Entry pass allows you to have expedited entry upon arrival in the United States. TSA Pre√ allows members of the U.S. Customs and Borders Protection Trusted Traveler programs to receive expedited screening while traveling.
These benefits include: leaving on your shoes, light outerwear, and belts as well as leaving laptops and 3-1-1 compliant liquids in carry-on bags. You can purchase only TSA Pre√ for $85 and it lasts for five years. But for $15 more, you can have both Global Entry AND TSA Pre√. To us, it was well worth it to settle on Global Entry!
How To Apply For Global Entry
You don’t have to be a U.S. citizen or permanent resident to have Global Entry. Global Entry is available for citizens in Mexico, Germany, the United Kingdom, the Netherlands, Panama, Singapore, South Korea, and many more! Citizens in Canada can apply for the NEXUS program to obtain Global Entry benefits.
- You will first need to create a Trusted Traveler Program (TTP) account.
- Once you have created your own personal TTP account you will log in to your account and complete the application. A $100 non-refundable fee is required for your application.
- After CBP reviews your completed application they will either conditionally approve your application or deny it. If you are conditionally approved you will need to schedule an interview at a Global Entry Enrollment Center on your TTP account.
What To Expect At Your Global Entry Interview
Once you have paid your Global Entry pass fee and are conditionally approved you can schedule your Global Entry interview. Luckily interview locations are in almost all 50 United States. Click here for a complete list of interview sites.
Here are the items you need to bring to your interview:
- Valid passport or permanent residence card
- A print-out of your conditional approval letter
- Proof of residency (valid driver’s license with current address, utility bill, mortgage, or rental statement).
On your interview day, follow the directions provided in your conditional approval letter with interview information. Global Entry sites within terminals vary between locations. Our suggestion is to show up 15 minutes early for your appointment.
Upon arrival, you will sit in a waiting area until your name is called by a CBP officer. The CBP officer will take you to a small interview room where you will be asked some identifying questions, have your photo taken for your Global Entry card, and give your fingerprints.
Pending confirmation at your Global Entry pass interview, you are eligible to start using your membership. Overall the interview is quick and painless!
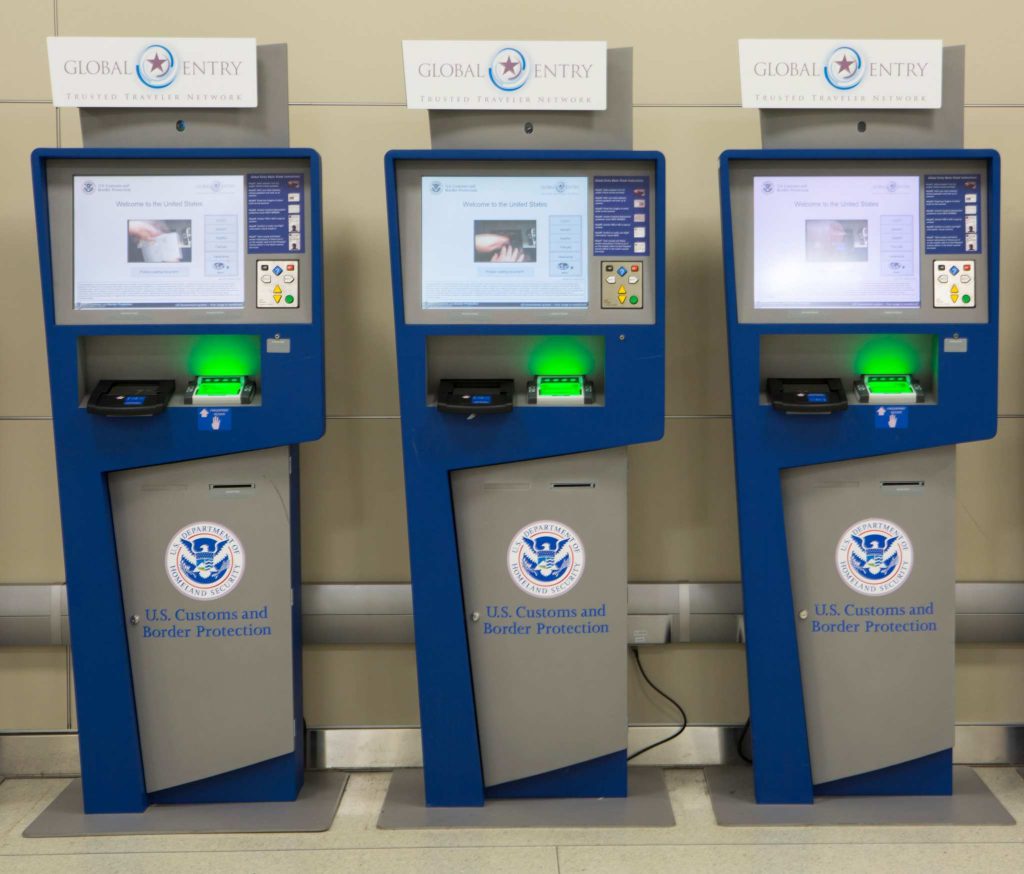
How To Use A Global Entry Kiosk
1. Verify Your Identity
- All Global Entry members will use either their United States passport or permanent resident card at Global Entry kiosks.
- You will insert your passport or resident card into the passport reader, the kiosk will show you directions on how to do this properly.
- After your personal data shows up on the kiosk screen you will remove your passport and look at the camera for your customs photo.
- The kiosk will then ask you to give your fingerprints, your four fingers on your right or left hand, to verify your Global Entry pass.
2. Declare All Your Goods
- After verifying your identity, the kiosk may show a customs declaration screen next. You will touch YES or NO to answer each declaration question. You must declare ALL goods purchased, received as gifts, or repaired/altered while abroad. FYI: With Global Entry, you do not need to complete any paper customs forms before arriving.
- You will also use the Global Entry kiosk to declare currency of more than $10,000 USD or any foreign equivalent in cash, travelers’ checks, or money orders.
- The kiosk will print a receipt that you will take to the baggage control inspection area or will turn green to alert you to proceed to the line for the next available agent. You will then declare currency with a Customs & Border Protection (CBP) officer and complete a currency reporting form.
- You must declare any food, fruits, vegetables, plants, insects, meats or meat products, dairy products, animals, disease agents, cell cultures, snails or soil. Also, if you have visited a farm or ranch outside of the United States you will need to let a CBP officer know that too.
3. Confirm All Flight Information
- If your flight information is correct when it displays simply select YES. If incorrect, select NO and provide airline, flight number, and city of departure to update your information.
- The kiosk will give you a paper receipt that you will take to the CBP officer assigned to the exit control area OR turn green and tell you to proceed to the line for the next available CBP officer.
- Know that if you have an “X” on the receipt, you will need to visit the nearest CBP officer for assistance. If you have an “O” on your receipt it means that you are declaring an item. The questions you answered YES will also be on the receipt.
- From there, you will proceed to baggage claim to collect checked bags and proceed to egress. At egress, the CBP will address the declarations made on the receipt.
How To Use Your TSA Pre√ Membership
1. Prior To Arrival
- After receiving your confirmation of membership you can start putting your membership number/PASSID on all flight bookings. With each airline that you have a registered account with, you can save your Known Traveler Number under your personal information. This will be automatically applied to any future flight reservations.
- If you have made flight reservations prior to receiving your Known Traveler Number you will need to update your flight information.
- When you check into your flight your boarding pass should show the TSA Pre√ symbol underneath your airline information.
2. At The Airport
- When arriving at the airport you will check your luggage as usual and head for airport security. Once there, you will look for the line that says TSA Pre√.
- Even if it seems like the TSA Pre√ is long, it will still be much quicker than going through regular security because you do not have to remove your shoes, light jackets, belts, laptops or 3-1-1 compliant liquids in your carry-on bags.
Are you ready to start travel hacking at its finest with your Global Entry pass and give yourself the gift of extra time? Sign up for Global Entry here.


Leave A Reply!